

Table of Contents
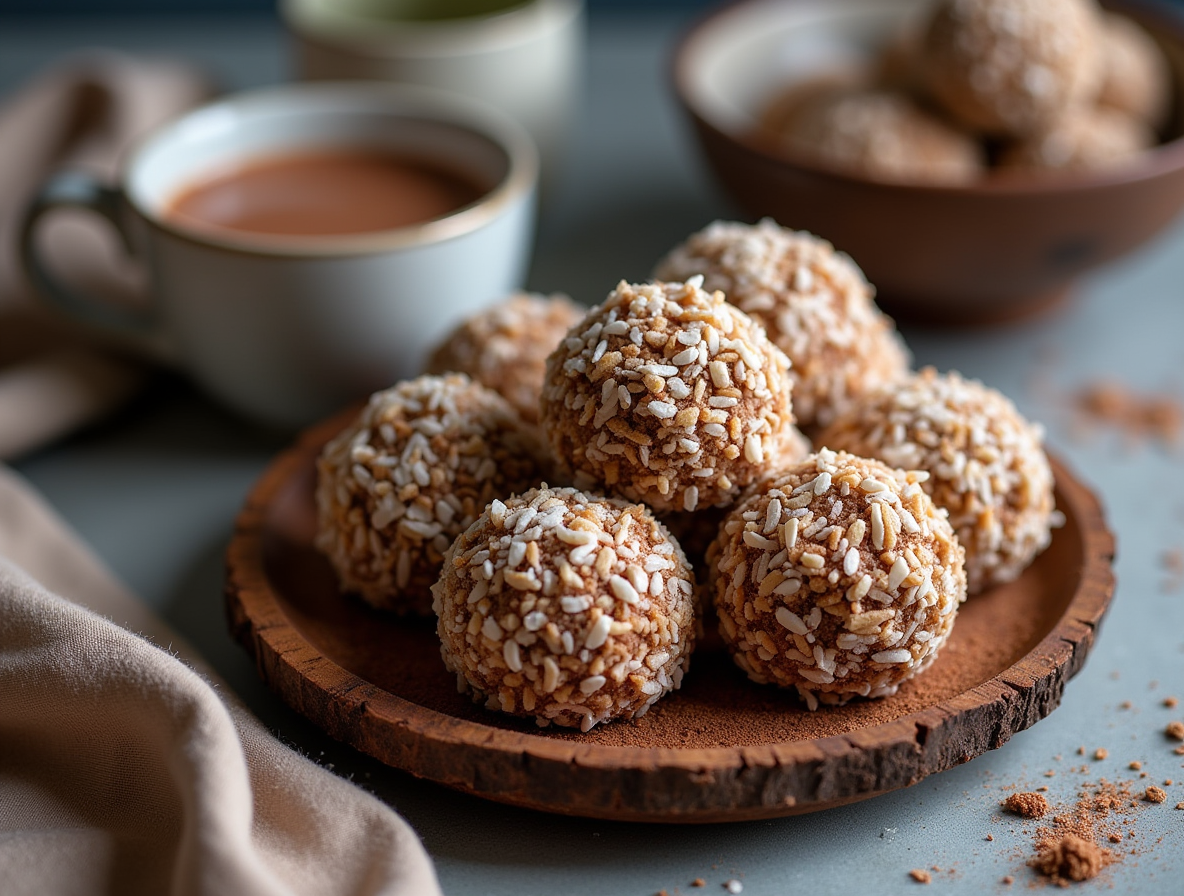
If you’re looking for a sweet, no-bake treat that’s easy to make and absolutely delicious, this Moose Farts recipe is just what you need! A classic Newfoundland dessert, these bite-sized delights are made with shredded coconut, sweetened condensed milk, and graham cracker crumbs, creating a rich, chewy, and irresistibly sweet snack.
Perfect for holidays, parties, or just a quick dessert craving, Moose Farts require no baking—just mix, roll, and chill! Whether you’re a fan of coconut treats or simply love easy, no-fuss desserts, this recipe is sure to become a favorite. Let’s dive into how you can make these delightful little bites at home!
More Internet-Famous Recipes
- Best Jiffy Mexican Cornbread Recipe
- Best Party Ribs Recipe
- Best Cowboy Casserole Recipe
- Best Turkey Injection Recipe
What Is the Moose Farts Recipe? A Delicious No-Bake Canadian Treat
If you’ve never heard of Moose Farts, you might be curious about what they are. Despite their amusing name, these no-bake treats from Newfoundland, Canada, are a favorite among dessert lovers. These small, sweet, coconut-based dessert balls are incredibly easy to make and require just a few simple ingredients. With a soft, chewy texture and a rich, sweet flavor, they are perfect for anyone who loves no-bake cookies, coconut desserts, or simple homemade treats.
The Origin of the Moose Farts Recipe
Moose Farts are a well-known Newfoundland dessert, often made during the holidays or for special occasions. While the exact origin of the name remains unclear, it’s likely due to the region’s love of quirky, humorous food names. Much like Beaver Tails and Butter Tarts, this treat has gained popularity beyond Canada, with more and more people discovering its deliciousness and ease of preparation.
Why Is the Moose Farts Recipe So Popular?
Moose Farts are popular for a few key reasons:
- They’re no-bake – No need to turn on the oven, making them a quick and effortless dessert.
- They use simple ingredients – Most of the ingredients are pantry staples like shredded coconut, sweetened condensed milk, and graham cracker crumbs.
- They’re bite-sized and convenient – Perfect for parties, gatherings, or just snacking at home.
- They have a deliciously chewy texture – The combination of coconut and condensed milk creates a soft, melt-in-your-mouth experience.
A Fun Treat for All Ages
Not only are Moose Farts delicious, but they’re also a fun treat to make with kids. The simple mix, roll, and chill process makes them a great dessert for little hands to help with. Plus, you can customize the recipe by adding chocolate chips, drizzling them with melted chocolate, or rolling them in nuts or sprinkles for extra flair.
Ingredients You Need for the Perfect Moose Farts Recipe
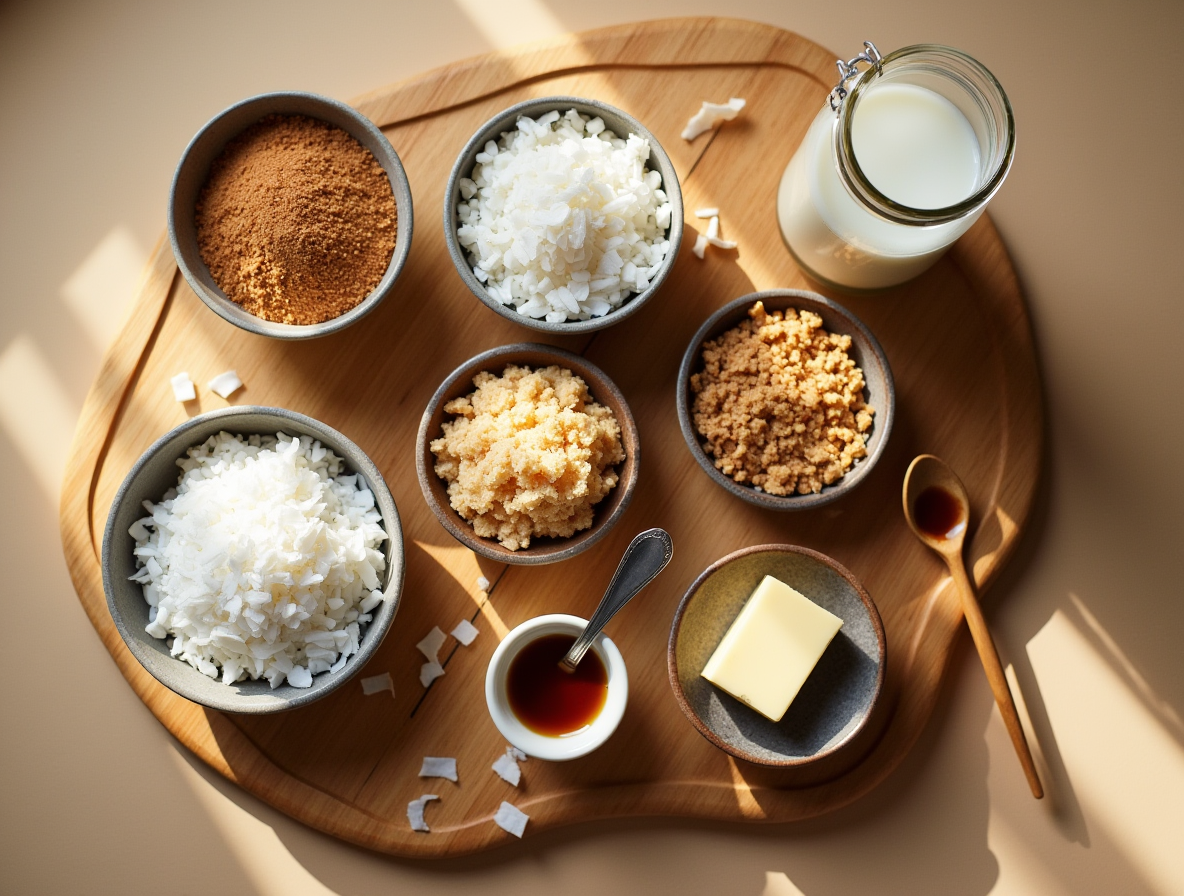
One of the best things about Moose Farts is how simple and accessible the ingredients are. You don’t need any fancy equipment or hard-to-find items—just a few pantry staples that come together to create a rich, chewy, and delicious no-bake treat. Let’s break down the key ingredients and how they contribute to the perfect Moose Farts recipe.
Main Ingredients in Moose Farts Recipe
- Shredded Coconut – This is the star of the recipe, giving Moose Farts their signature chewy texture and coconutty flavor. Unsweetened coconut works best, as the condensed milk adds enough sweetness, but you can also use sweetened coconut for an extra indulgent treat.
- Sweetened Condensed Milk – This thick, creamy ingredient binds everything together while adding a deliciously rich and sweet flavor. It also helps create the smooth, slightly sticky texture that makes the balls easy to roll.
- Graham Cracker Crumbs – These add a subtle crunch and help balance the sweetness of the condensed milk. They also give the mixture some structure, preventing it from being too wet or sticky. If you don’t have graham crackers, you can substitute with digestive biscuits, vanilla wafers, or crushed shortbread cookies.
- Butter – A small amount of butter adds richness and helps bring the ingredients together smoothly. It also enhances the flavor, making each bite even more satisfying.
- Vanilla Extract – A dash of vanilla enhances the overall flavor and adds a warm, sweet aroma that complements the coconut and condensed milk beautifully.
Optional Add-Ins for Extra Flavor in Moose Farts Recipe
While the classic Moose Farts recipe is delicious on its own, you can customize it with different add-ins to suit your taste. Here are some popular options:
- Chocolate Chips – Mini chocolate chips add a delightful burst of chocolate flavor in every bite. You can mix them into the dough or melt some chocolate and drizzle it over the finished treats.
- Nuts – Chopped pecans, walnuts, or almonds add a nutty crunch and depth of flavor.
- Cocoa Powder – Mixing in a little cocoa powder gives a mild chocolate flavor, making them taste like chocolate coconut truffles.
- Sprinkles – If you’re making these for a festive occasion, rolling them in colorful sprinkles adds a fun touch.
- Sea Salt – A tiny sprinkle of sea salt on top can balance the sweetness and enhance all the flavors.
Best Ingredient Substitutions for Dietary Preferences
If you need to make Moose Farts gluten-free, dairy-free, or lower in sugar, here are some simple ingredient swaps:
- Gluten-Free Version – Use gluten-free graham crackers or almond flour instead of regular graham cracker crumbs.
- Dairy-Free Version – Replace sweetened condensed milk with coconut condensed milk and use a dairy-free butter alternative.
- Lower Sugar Option – Use unsweetened coconut and substitute sweetened condensed milk with a mix of coconut cream and a sugar alternative like monk fruit sweetener or honey.
Step-by-Step Guide – How to Make Moose Farts
Making Moose Farts is incredibly easy and requires no baking—just mix, roll, and chill! Whether you’re a beginner in the kitchen or an experienced baker looking for a quick and delicious dessert, this step-by-step guide will help you create the perfect batch of Moose Farts.
1: Gather Your Ingredients and Equipment
Before you start, make sure you have all your ingredients measured and ready. Here’s what you’ll need:
Ingredients:
- 2 cups shredded coconut (unsweetened or sweetened)
- 1 can (14 oz) sweetened condensed milk
- 1 cup graham cracker crumbs
- 2 tablespoons butter, melted
- 1 teaspoon vanilla extract
Optional Add-Ins:
- ½ cup mini chocolate chips (for a chocolatey twist)
- ¼ cup chopped nuts (for extra crunch)
- 1 tablespoon cocoa powder (for a richer chocolate flavor)
Equipment:
- Large mixing bowl
- Wooden spoon or spatula
- Measuring cups and spoons
- Baking sheet lined with parchment paper
- Small cookie scoop or spoon
- Refrigerator for chilling
2: Mix the Ingredients
- In a large mixing bowl, combine the shredded coconut and graham cracker crumbs. Stir them together to distribute evenly.
- Add the melted butter and vanilla extract, then pour in the sweetened condensed milk. Stir well until all ingredients are fully combined, and you get a sticky, dough-like mixture.
- If using optional add-ins like chocolate chips or nuts, gently fold them into the mixture.
3: Shape the Moose Farts
- Use a small cookie scoop or a spoon to scoop out portions of the mixture.
- Roll each portion into a small ball (about 1-inch in diameter) using your hands. If the mixture feels too sticky, lightly grease your hands with butter or coconut oil.
- Place each rolled ball onto a parchment-lined baking sheet, spacing them slightly apart.
4: Chill for the Best Texture
- Transfer the baking sheet to the refrigerator and chill for at least 30 minutes. This helps the Moose Farts firm up and enhances their chewy texture.
- For an extra firm texture, you can also place them in the freezer for 15 minutes before serving.
5: Serve and Enjoy!
- Once chilled, your Moose Farts are ready to eat! Enjoy them straight from the fridge, or let them sit at room temperature for a couple of minutes if you prefer a softer texture.
- Store leftovers in an airtight container in the fridge for up to a week or freeze for up to three months for a longer shelf life.
Tips for Making the Perfect No-Bake Moose Farts Recipe Every Time
Making Moose Farts is incredibly easy, but a few simple tips can take your no-bake dessert to the next level. Whether you’re making them for the first time or looking to perfect your technique, these expert tips will ensure your Moose Farts turn out chewy, flavorful, and irresistible every time.
1. Use Fresh and High-Quality Ingredients
Since Moose Farts have only a few key ingredients, their quality matters. Here’s what to look for:
- Shredded Coconut – Choose unsweetened coconut if you want to control the sweetness or sweetened coconut for extra flavor.
- Sweetened Condensed Milk – A high-quality brand will have a thicker consistency and a richer flavor. Avoid watery or thin condensed milk.
- Graham Cracker Crumbs – Fresh crumbs provide the best texture. If using pre-ground crumbs, check for freshness to avoid a stale taste.
2. Adjust the Texture If Needed
Moose Farts should have a slightly sticky but firm consistency that holds its shape when rolled. If your mixture feels too wet or too dry, here’s how to fix it:
- Too wet or sticky? Add more graham cracker crumbs (1 tablespoon at a time) to absorb excess moisture.
- Too dry or crumbly? Add a small amount of sweetened condensed milk or a teaspoon of melted butter to help bind the mixture.
3. Keep Your Hands Lightly Greased
Since the mixture is sticky, rolling the balls can sometimes get messy. To prevent this:
- Lightly grease your hands with butter or coconut oil before rolling.
- You can also chill the mixture for 10–15 minutes before rolling to firm it up.
4. Customize with Fun Add-Ins
While the classic recipe is delicious, you can easily customize Moose Farts for different flavors and textures:
- Chocolate Lovers: Add mini chocolate chips or drizzle the finished balls with melted dark chocolate.
- Nutty Crunch: Mix in chopped walnuts, pecans, or almonds for extra crunch.
- Holiday Twist: Roll the balls in sprinkles, cocoa powder, or crushed peppermint for a festive look.
- Tropical Flavor: Add a dash of lime zest or some finely chopped dried pineapple for a tropical twist.
5. Chill for the Best Results
Letting Moose Farts chill before serving is key to the perfect texture.
- Minimum chilling time: 30 minutes in the fridge or 15 minutes in the freezer.
- Overnight chilling: If you have time, leaving them in the fridge overnight makes them even better by allowing the flavors to fully blend.
6. Store Them Properly for Freshness
To keep your Moose Farts fresh and delicious:
- Refrigerate: Store them in an airtight container in the fridge for up to 1 week.
- Freeze for Longer Storage: Moose Farts freeze well! Place them in a sealed container or freezer bag and store for up to 3 months. Thaw in the fridge before serving.
7. Make Them Ahead for Easy Snacking
Moose Farts are perfect for meal prep or parties because they can be made ahead of time:
- Prepare a double batch and freeze half for later.
- Make them a day in advance if serving at an event.